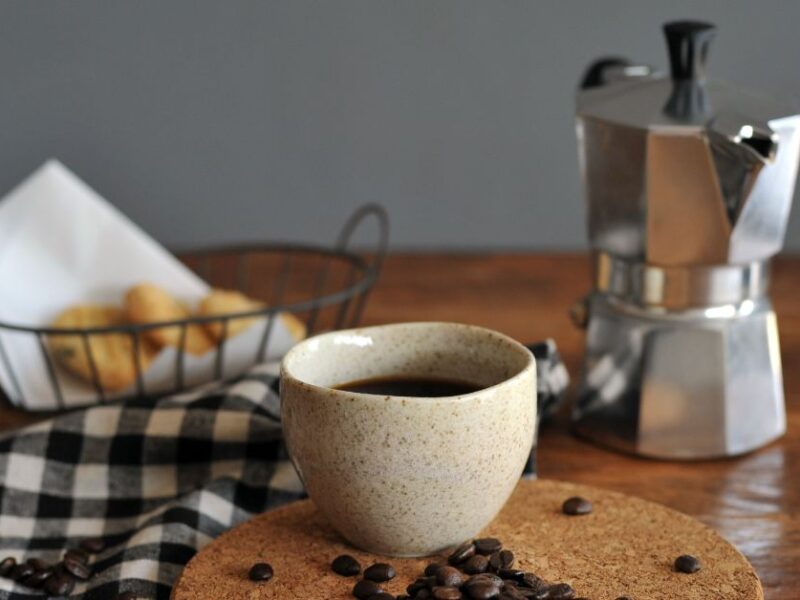
Picture this: the aroma of freshly brewed coffee filling your kitchen, a rich and robust scent that promises to kickstart your day with a burst of energy. If you’re tired of the same old drip coffee and want to savor a cup that’s both nostalgic and flavorful, then learning how to make coffee with a percolator could be your new morning ritual.
This classic brewing method might seem a bit old-school, but it’s making a comeback—and for good reason. With each perk, you’re not just brewing coffee; you’re crafting an experience. Are you ready to discover the secrets behind the perfect percolator brew?
Keep reading to transform your coffee routine into something truly special.

Credit: www.youtube.com
Choosing The Right Percolator
Choosing the right percolator is crucial to brewing that perfect cup of coffee. With so many options available, it can be overwhelming to decide which one suits your needs. Whether you’re a seasoned coffee enthusiast or just starting your percolator journey, understanding the different types, materials, and sizes can make all the difference.
Types Of Percolators
Percolators come in various types, each with its unique characteristics. The most common are stovetop and electric percolators. Stovetop percolators offer a traditional brewing experience, requiring manual heat control. They are perfect for outdoor adventures or those who enjoy a hands-on approach.
Electric percolators, on the other hand, provide convenience and consistency. They automatically regulate the brewing temperature, making it easier for beginners. Think about your lifestyle and brewing preferences when deciding between the two.
Material Considerations
The material of your percolator affects both the taste and durability of your coffee. Stainless steel is popular for its durability and resistance to rust. It’s perfect for frequent use and easy to clean. Glass percolators offer a visually appealing brewing process, allowing you to watch the coffee percolate.
However, glass is more fragile and may not be ideal for those prone to accidental knocks. Consider how often you’ll use your percolator and your willingness to handle delicate items.
Size And Capacity
Think about how many cups of coffee you typically brew. Percolators vary in size, from compact models ideal for one or two cups to larger ones that can serve a crowd. A smaller percolator is perfect for solo coffee lovers or small households.
If you entertain guests frequently or have a large family, a bigger percolator might be more practical. Consider the space in your kitchen or camping gear as well. A compact percolator saves space and is easier to store.
Do you savor the brewing process, or prefer a quick fix? Each choice tells a story about your coffee journey. Choose wisely and let your percolator become a cherished part of your routine.
Credit: bigcupofcoffee.com
Preparing Your Ingredients
Start by gathering fresh coffee beans and clean water for brewing. Measure your coffee grounds and water carefully. This ensures a perfect balance of flavor. Organize all necessary tools, like your percolator, filter, and cups, before beginning the process.
Preparing your ingredients is the first step to brewing a perfect cup of coffee with a percolator. The choices you make here will greatly influence the taste and aroma of your coffee. From selecting the right coffee beans to ensuring the water is just right, each component plays a crucial role in the final experience.
Selecting Coffee Beans
Choosing the right coffee beans is like choosing the perfect book to read on a cozy afternoon. Do you prefer a bold, dark roast that wakes up your senses or a smooth, light roast that eases you into the day? Consider trying different origins and roasts. Many coffee enthusiasts find that beans from Ethiopia offer fruity notes, while Colombian beans are known for their balanced flavor. Your choice should reflect your taste preferences, so don’t hesitate to experiment.
Grinding Coffee For Percolation
Once you’ve selected your beans, it’s time to grind them. The grind size is critical for percolation. Too fine, and your coffee might turn out bitter; too coarse, and it could be weak and watery. Aim for a coarse grind, similar to the texture of sea salt. This allows for optimal extraction during the brewing process. If you’re using a manual grinder, adjust the settings and test the grind by rubbing it between your fingers.
Water Quality And Temperature
Have you ever thought about how water quality affects your coffee? Using filtered water can make a significant difference, as tap water often contains impurities that alter the taste. Fill your percolator with cold, filtered water for the best results. The temperature of the water plays a role too. Starting with cold water allows the percolator to gradually heat and extract the flavors evenly, providing a richer taste. By taking these steps to prepare your ingredients, you’re setting the stage for a delightful coffee experience. What will you discover in your next cup?
Setting Up The Percolator
Setting up a percolator is the first step to brewing great coffee. This method brings out rich flavors and aromas. Follow these steps to ensure a perfect cup every time. Get ready to enjoy a satisfying coffee-making process.
Assembling The Components
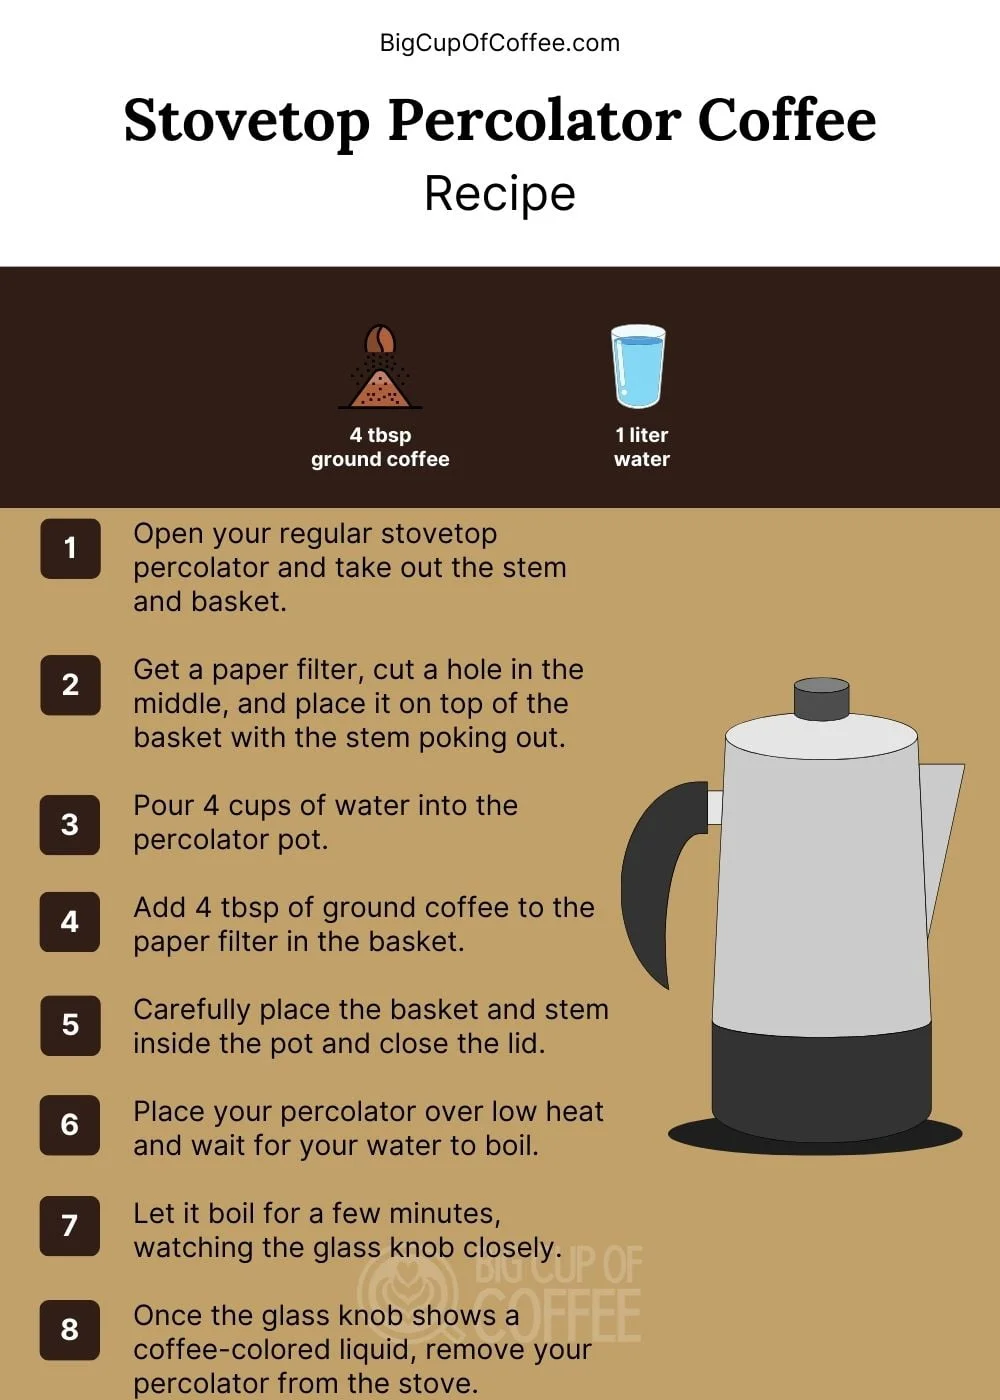
Start by gathering all the parts of the percolator. You need the pot, basket, and stem. Check that they are clean and dry. Place the stem into the pot. Make sure it stands straight. This helps the water circulate properly. Now, fit the basket on the top of the stem. Ensure it sits securely. The lid should fit snugly on the pot. This setup prepares your percolator for the next steps.
Adding Coffee Grounds
Choose your favorite coffee blend. Grind it to a coarse texture. This prevents clogging and ensures smooth brewing. Measure the right amount of coffee grounds. A standard ratio is one tablespoon per cup of water. Pour the grounds into the basket. Spread them evenly. Avoid overfilling the basket. This keeps the coffee from spilling during brewing.
Filling With Water
Fill the pot with cold water. Follow the cup measurements on the pot. Avoid overfilling to prevent overflow. The water level should be below the basket. This allows the steam to flow through the grounds. Cold water enhances flavor extraction. Place the lid back on the pot. Your percolator is now ready to brew.
Brewing Process
Creating coffee with a percolator involves boiling water through coffee grounds repeatedly. This process extracts rich flavors, resulting in a strong, aromatic brew. Perfect for those who enjoy a traditional coffee-making method.
Brewing coffee with a percolator is a delightful journey that combines simplicity with a touch of nostalgia. The process involves a rhythmic dance of water and coffee grounds, resulting in a rich, aromatic brew. Whether you’re a seasoned coffee enthusiast or a curious beginner, mastering the percolator can elevate your morning ritual. Let’s delve into the brewing process.
Timing The Brew
Timing is crucial when using a percolator. It determines the strength and flavor of your coffee. Start by setting a timer for around 7 to 10 minutes. Keep an eye on the clock, but also trust your senses. The aroma will guide you. Does it smell just right, or is it turning a bit too strong?
Monitoring The Percolation
Watching the percolation is both mesmerizing and essential. The clear knob at the top of most percolators allows you to see the coffee bubbling up. Pay attention to the color of the liquid. A light amber indicates a mild brew, while a dark brown suggests a stronger cup. What shade suits your taste?
Adjusting Heat Levels
Managing the heat is a balancing act. Too much heat can scorch your coffee, while too little may leave it under-extracted. Start with medium heat. As the percolation begins, reduce the heat to maintain a gentle, consistent bubble. Have you ever noticed how a slight adjustment can perfect the brew? Remember, the joy of percolator coffee lies in its simplicity and the personal touch you bring to it. Each tweak and observation helps you find the perfect cup for your taste. So, grab your percolator, and let the brewing adventure begin!
Serving Your Coffee
You’ve brewed a pot of coffee with your percolator. Now, it’s time to serve. Proper serving enhances the experience. It keeps the flavors intact. From pouring techniques to flavor enhancements, every step counts. Let’s explore the best ways to serve your percolated coffee.
Pouring Techniques
Pouring coffee requires care. Hold the percolator handle firmly. Tilt it slowly to avoid spills. Use a steady hand. Pouring too fast can create a mess. It may also disturb the coffee’s aroma. Aim for a gentle, even pour. This ensures each cup has a balanced flavor.
Enhancing Flavor
Enhancing coffee flavor is simple. Start with fresh milk or cream. These add richness to your coffee. Sugar is another option. A small spoonful boosts sweetness. Spices like cinnamon or nutmeg can be sprinkled. They give a warm, spicy note. Always taste as you go. Find the right balance for your palate.
Storage Tips
Store leftover coffee in an airtight container. This keeps it fresh longer. Refrigerate if you plan to drink it later. Avoid leaving coffee on the counter. Exposure to air ruins its taste. Reheat it gently on the stove or microwave. Avoid boiling it again. This can make the coffee taste bitter.

Credit: www.homegrounds.co
Maintenance And Cleaning
Cleaning a coffee percolator ensures great-tasting coffee every time. Regularly rinse all parts with warm, soapy water. Dry thoroughly to prevent rust and keep flavors fresh.
Maintaining your percolator is crucial for brewing a perfect cup of coffee each time. Without proper cleaning, coffee residue can build up, impacting the taste and aroma of your brew. Let’s dive into some easy-to-follow maintenance tips that will keep your percolator in top-notch condition.
Routine Cleaning
After every use, ensure you clean your percolator thoroughly. Start by disassembling the parts, including the basket and tube. Rinse them under warm water and use a mild detergent to eliminate coffee oils. A soft brush can reach into those tricky spots. Don’t forget to clean the exterior; a damp cloth works wonders. Make this a habit, and your percolator will thank you with every fresh brew.
Dealing With Residue
Sometimes, mineral deposits and coffee residue can stubbornly cling to your percolator. A monthly deep clean using a mixture of vinegar and water can tackle this issue. Simply fill the pot with equal parts water and vinegar, then let it percolate through a cycle. Rinse thoroughly to remove any vinegar taste. You might be surprised at how this simple trick enhances your coffee’s flavor. It’s a small effort for a big reward.
Long-term Care
Think about your percolator as a long-term investment in your coffee enjoyment. Regularly inspect the rubber seals and gaskets for wear and tear. Replace any damaged parts to prevent leaks and maintain efficiency. Store your percolator in a dry place to avoid rust. Remember, a well-maintained percolator brews better coffee. What steps will you take today to ensure your percolator stands the test of time?
Troubleshooting Common Issues
Brewing coffee with a percolator can sometimes lead to common issues. Adjusting the grind size and water temperature often helps. Ensure the percolator is clean for the best taste.
Brewing coffee with a percolator can be a rewarding experience, but sometimes things don’t go as planned. Whether it’s weak coffee, over-brewing, or malfunctioning equipment, these common issues can turn your morning cup into a frustrating ordeal. Let’s dive into some practical solutions to keep your percolator brewing smoothly.
Weak Coffee Problems
Weak coffee is a common complaint among percolator users. Start by checking your coffee-to-water ratio. Too much water or too little coffee can dilute the flavor. Ensure you are using the right grind size. A coarse grind is best for percolators. Fine grinds can slip through the filter basket and weaken the brew. Remember, freshness matters. Use fresh coffee beans and grind them just before brewing for a richer taste. Have you tried experimenting with different coffee brands or blends?
Over-brewing Concerns
Over-brewing can result in a bitter or burnt taste. Timing is crucial here. Keep an eye on the brewing process and remove the percolator from the heat as soon as the coffee is ready. Test different brewing times to find your perfect cup. A typical brew takes about 7 to 10 minutes, but your preference might differ. Does your percolator have a built-in timer? If so, use it to avoid manual monitoring and ensure consistent results.
Percolator Malfunctions
Percolator not working? First, check if it’s plugged in or if the stove is on. It might sound simple, but it’s an easy oversight. Inspect the percolator parts for any signs of damage or wear. A faulty heating element or a clogged filter basket can disrupt the brewing process. Regular cleaning can prevent malfunctions. Ensure all parts are dry before storing to avoid rust or corrosion. What maintenance routine do you follow for your percolator? Addressing these issues can enhance your coffee-making experience. Don’t let a few bumps in the road deter you from enjoying your perfect brew.
Frequently Asked Questions
What Is A Coffee Percolator?
A coffee percolator is a type of pot used for brewing coffee. It continually cycles boiling water through coffee grounds, resulting in a stronger flavor. This method was popular before drip coffee makers and is favored by those who enjoy robust coffee.
How Does A Percolator Work?
A percolator works by using steam pressure to push boiling water upwards. The water then passes over coffee grounds repeatedly. This process extracts flavors from the coffee grounds, resulting in a rich and strong coffee. The cycle continues until the desired strength is achieved.
What Grind Size Is Best For Percolators?
Medium to coarse grind size is ideal for percolators. Fine grinds can clog the filter and result in over-extraction. Coarse grounds allow water to flow easily, providing balanced extraction. This ensures a smooth and flavorful coffee without bitterness.
How Long Should Coffee Brew In A Percolator?
Brewing coffee in a percolator typically takes 7 to 10 minutes. The exact time may vary based on personal taste preferences. Longer brewing can result in a stronger coffee, while shorter brewing produces a lighter taste. Adjust the time to match your desired strength.
Conclusion
Making coffee with a percolator is simple and rewarding. Follow these steps for a flavorful brew. Start with fresh coffee grounds and clean water. Adjust the strength to your taste. Watch the percolator closely. Timing is key for perfect coffee.
Experiment to find your ideal balance. Enjoy the rich aroma and taste. Share your percolator coffee with friends. They’ll love it. Practice makes perfect. Soon, brewing with a percolator will be second nature. A classic method that never fails. Happy brewing!

