If you love a great cup of coffee, you’re going to want to try making it with an Aeropress. This simple device lets you brew rich, smooth coffee quickly and easily—right in your own kitchen.
Imagine waking up to the perfect cup, made just the way you like it, without any complicated machines or long waits. In this guide, you’ll discover step-by-step how to use your Aeropress to get the best flavor every time. Ready to take your coffee game to the next level?
Keep reading—you won’t regret it.
Choosing Coffee Beans
Choosing the right coffee beans is a key step in making great coffee with an AeroPress. The beans you pick affect the flavor, strength, and aroma of your brew. Different beans offer different tastes, from fruity and bright to deep and rich. Knowing how to select and prepare your beans helps you enjoy a fresh and tasty cup every time.
Selecting The Right Roast
The roast level of coffee beans changes the flavor and body of your AeroPress coffee. Roasts range from light to dark, each giving a unique taste experience.
- Light Roast: Bright and fruity. It keeps the original flavors of the coffee bean. Good for those who enjoy a fresh, crisp taste.
- Medium Roast: Balanced flavor with moderate acidity. It has a smooth taste, making it popular for everyday drinking.
- Dark Roast: Strong and bold. The roasting process adds smoky and chocolatey notes. It is less acidic and heavier in body.
Here is a simple table to compare the roast levels:
| Roast Level | Flavor Profile | Acidity | Body |
|---|---|---|---|
| Light | Fruity, bright, floral | High | Light |
| Medium | Balanced, sweet, nutty | Medium | Medium |
| Dark | Bold, smoky, chocolatey | Low | Full |
Choose a roast that fits your taste. Light roasts highlight origin flavors. Dark roasts offer a strong, classic coffee feel. Medium roasts sit in the middle, pleasing many palates.
Grinding Coffee For Aeropress
Grinding coffee properly is vital for AeroPress brewing. The grind size controls how fast water extracts flavors from the coffee. Too fine a grind can cause over-extraction and bitterness. Too coarse a grind can lead to weak, under-extracted coffee.
For AeroPress, a medium-fine grind works best. It is finer than drip coffee but not as fine as espresso.
- Grind Size: Medium-fine, similar to table salt.
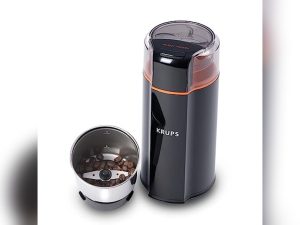
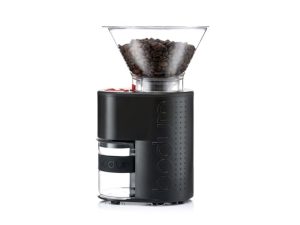
- Consistency: Use a burr grinder for even particles.
- Freshness: Grind just before brewing for the best flavor.
The AeroPress brewing time is short, usually about 1-2 minutes. The medium-fine grind allows water to pass through at the right speed. This releases balanced flavors and smooth texture.
Try this quick guide for grind size:
- Start with a medium grind.
- Adjust grind finer if coffee tastes weak.
- Adjust grind coarser if coffee tastes bitter.
Perfecting your grind takes practice. Keep notes on grind size and taste to find your favorite setting. This step makes a big difference in your AeroPress coffee quality.
Preparing The Aeropress
Preparing the AeroPress is the first key step in making a rich and smooth cup of coffee. This process involves putting together the parts correctly and setting up the filter to ensure the coffee brews well. Taking time to prepare the AeroPress properly can improve the taste and make the brewing faster and cleaner. A well-prepared AeroPress also makes cleanup easier after brewing. Follow these simple steps to get your AeroPress ready.
Assembling The Components
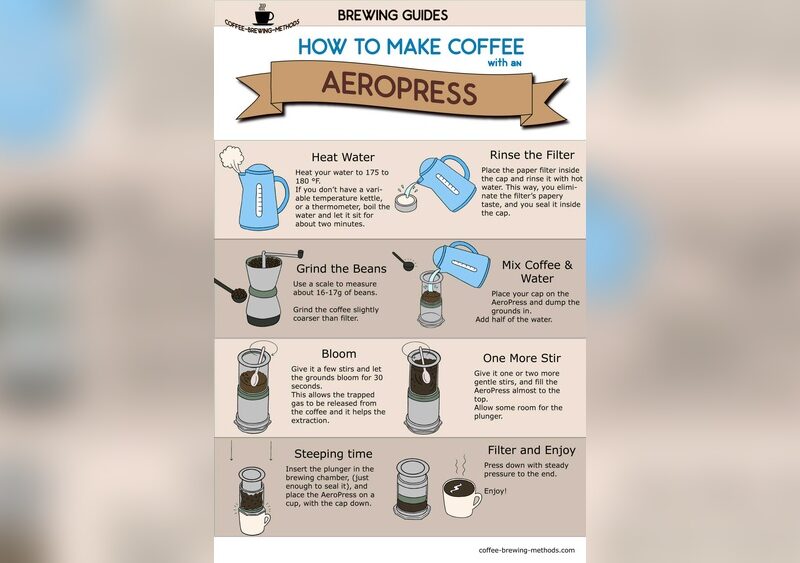
The AeroPress consists of a few main parts that must fit together securely. These parts include the chamber, the plunger, the filter cap, and the filter itself. Start by holding the chamber with the open side facing up. Then, insert the plunger gently into the chamber’s open end. Push the plunger down slightly to create a seal, but do not push it all the way through.
Next, attach the filter cap to the bottom of the chamber. This cap holds the paper or metal filter in place. Make sure the cap fits tightly to prevent leaks during brewing. Check if all parts are clean and dry before assembling. Dirty or wet parts can affect the coffee’s flavor and brewing process.
Use this checklist to assemble your AeroPress:
- Place the chamber on a flat surface.
- Insert the plunger into the chamber carefully.
- Attach the filter cap to the chamber’s bottom.
- Ensure all parts are clean and dry.
| Component | Purpose |
|---|---|
| Chamber | Holds coffee grounds and hot water |
| Plunger | Presses coffee through the filter |
| Filter Cap | Secures the filter at the bottom |
Inserting The Filter
The filter plays a vital role in brewing AeroPress coffee. It keeps the coffee grounds from passing into your cup. Most AeroPress users prefer paper filters, but metal filters are also an option. Start by choosing the filter type that suits your taste and cleaning preferences.
Place the filter inside the filter cap. Make sure the filter lies flat and covers the entire surface area of the cap. Wetting the paper filter with hot water before brewing helps remove paper taste. It also helps the filter stick firmly to the cap. This step prevents leaks and improves the coffee flow.
Follow these steps to insert the filter properly:
- Select a paper or metal filter.
- Put the filter inside the filter cap.
- Press the filter gently to flatten it.
- Rinse the paper filter with hot water (optional).
- Attach the filter cap with filter to the chamber.
Proper filter insertion ensures smooth brewing and clean coffee. It stops coffee grounds from slipping through and keeps your cup free from grit. Take your time with this step to enjoy a perfect AeroPress coffee.
Measuring Coffee And Water
Measuring coffee and water correctly is key to brewing a great cup with an Aeropress. The right amounts bring out the best flavors and avoid bitterness or weakness. Simple tools like a kitchen scale and a thermometer help keep measurements accurate. This section explains how to find the perfect coffee-to-water ratio and pick the best water temperature for your Aeropress coffee.
Ideal Coffee-to-water Ratio
Finding the right coffee-to-water ratio makes a big difference in taste. Too much coffee can make the brew bitter. Too little coffee results in weak flavor. The Aeropress works well with flexible ratios, depending on your taste.
Start with this standard ratio:
- 1:15 ratio – 1 gram of coffee to 15 grams of water
This means if you use 15 grams of coffee, pour 225 grams of water. It creates a balanced cup with good strength and clarity.
Adjust the ratio to taste:
- Stronger coffee: use 1:12 ratio (more coffee, less water)
- Milder coffee: use 1:17 ratio (less coffee, more water)
Here is a simple table for reference:
| Coffee (grams) | Water (grams) | Ratio |
|---|---|---|
| 15 | 225 | 1:15 (standard) |
| 18 | 216 | 1:12 (strong) |
| 12 | 204 | 1:17 (mild) |
Use a kitchen scale for precise measurement. Aeropress coffee needs accuracy to taste great every time. Measure coffee grounds before brewing and weigh water with a scale or measuring cup.
Water Temperature Tips
Water temperature changes coffee flavor a lot. Too hot water can burn the coffee and taste bitter. Too cold water won’t extract enough flavor. The best temperature range for Aeropress coffee is between 175°F and 205°F (80°C to 96°C).
Follow these tips for water temperature:
- Heat water and let it cool for 30 seconds to 1 minute after boiling.
- Use a thermometer for accuracy.
- Aim for about 195°F (90°C) for balanced extraction.
Different temperatures suit different coffee types:
- Light roasts: Higher end of the range (200°F to 205°F) to bring out brightness.
- Dark roasts: Lower end of the range (175°F to 185°F) to avoid bitterness.
Here is a simple guide to water temperature and coffee roast:
| Coffee Roast | Water Temperature | Effect |
|---|---|---|
| Light Roast | 200°F – 205°F (93°C – 96°C) | Bright, fruity flavors |
| Medium Roast | 190°F – 200°F (88°C – 93°C) | Balanced, sweet taste |
| Dark Roast | 175°F – 185°F (80°C – 85°C) | Smooth, less bitter |
Using proper temperature keeps coffee smooth and flavorful. Avoid boiling water directly on coffee grounds. Let water cool a bit before pouring into the Aeropress.
Brewing Techniques
Brewing Techniques with an AeroPress shape the flavor and strength of your coffee. The method you choose affects extraction time and taste. Two popular ways to brew are the Standard Method and the Inverted Method. Both give unique results and suit different preferences. Understanding these techniques helps make a better cup every time.
Standard Method
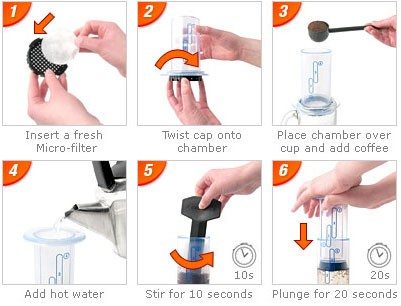
The Standard Method is the classic way to brew with an AeroPress. It is simple and quick, perfect for beginners and those who want a clean, smooth coffee. Here’s how it works:
- Place a paper filter in the cap and rinse it with hot water.
- Attach the cap to the AeroPress chamber and place it over your cup.
- Add medium-ground coffee to the chamber (about 14-17 grams).
- Pour hot water (about 85-92°C) up to the top of the chamber.
- Stir gently for 10 seconds to mix the coffee and water.
- Press down slowly for about 20-30 seconds.
This method creates a crisp cup with less sediment. It’s easy to clean and works well with lighter roasts or delicate flavors.
| Step | Action | Time |
|---|---|---|
| 1 | Rinse filter and assemble AeroPress | 1 minute |
| 2 | Add coffee and water | 1 minute |
| 3 | Stir and steep | 10 seconds |
| 4 | Press coffee into cup | 20-30 seconds |
Use this method for a straightforward, balanced coffee. It highlights clarity and brightness in the cup.
Inverted Method
The Inverted Method flips the AeroPress upside down. This technique increases immersion time and produces a richer, fuller flavor. It suits those who like strong, bold coffee.
Follow these steps:
- Place the plunger on a flat surface and insert it about 1 cm into the chamber.
- Turn the AeroPress upside down so the chamber is on top and the plunger is below.
- Add coffee grounds to the chamber (14-17 grams).
- Pour hot water (85-92°C) over the coffee.
- Stir gently for 10 seconds.
- Attach the filter cap with a rinsed paper filter.
- Let the coffee steep for 1 to 2 minutes.
- Carefully flip the AeroPress over your cup.
- Press down slowly to extract the coffee.
This method allows full immersion, extracting more oils and flavors. It results in a thicker, stronger cup with more body.
| Step | Action | Time |
|---|---|---|
| 1-4 | Setup inverted and add coffee + water | 2 minutes |
| 5-7 | Stir, cap, and steep | 1-2 minutes |
| 8-9 | Flip and press coffee | 20-30 seconds |
Take care when flipping to avoid spills. This method suits coffee lovers who want a deep, intense cup.
Pressing And Serving
After brewing coffee with an AeroPress, the pressing and serving steps are crucial for a great cup. Pressing extracts the rich flavors, while serving affects the overall taste and experience. Both steps require care and attention to enjoy the full potential of AeroPress coffee.
Proper Pressing Technique
Pressing the AeroPress correctly ensures a smooth, strong coffee without bitterness. Use steady, gentle pressure rather than forceful pushing. This method helps avoid grounds leaking into your cup and keeps the coffee balanced.
Follow these steps for proper pressing:
- Place the AeroPress on a sturdy cup or mug.
- Insert the plunger carefully into the chamber, sealing the coffee and water inside.
- Press down slowly with steady force, aiming for a 20-30 second press.
- Stop pressing as soon as you hear a hissing sound. This means all liquid is extracted.
Too fast pressing can cause coffee to be weak or uneven. Too much force may push bitter compounds into the cup.
| Pressing Speed | Effect on Coffee |
|---|---|
| Slow and steady | Balanced flavor, smooth texture |
| Fast and hard | Bitter taste, uneven extraction |
Remember, pressing is about control. Keep your hand steady and focus on a gentle push. This simple step improves the taste and texture of your coffee.
Serving Suggestions
Serving AeroPress coffee offers many options. The coffee is strong and concentrated, similar to espresso, so adjust servings based on your taste.
Try these serving ideas:
- Black: Serve directly after pressing. Enjoy the pure, bold flavor.
- Americano: Add hot water to dilute and create a lighter drink.
- Milk-based: Mix with steamed milk for a creamy latte or cappuccino.
- Iced coffee: Pour over ice for a refreshing cold drink.
Use this table to guide your serving ratio:
| Serving Style | Coffee to Water/Milk Ratio | Taste |
|---|---|---|
| Black | 1:0 (pure coffee) | Strong, bold |
| Americano | 1:2 or 1:3 (coffee to hot water) | Mild, smooth |
| Latte/Cappuccino | 1:2 (coffee to steamed milk) | Creamy, soft |
| Iced | 1:1 or more (coffee to ice) | Cool, refreshing |
Keep cups warm before serving to maintain coffee temperature longer. Use ceramic or glass cups for best flavor retention.
Serving AeroPress coffee with care enhances every sip. Experiment with these methods to find your favorite way to enjoy it.

Credit: www.bluecoffeebox.com
Cleaning And Maintenance
Keeping your AeroPress clean is important for great coffee and a long-lasting device. Regular cleaning removes old coffee oils and grounds that can change the taste of your brew. Proper maintenance also prevents clogging and damage. A clean AeroPress means better flavor and smoother brewing every time.
Disassembling The Aeropress
Start by taking apart the AeroPress carefully. This makes cleaning easier and more thorough. The AeroPress has four main parts:
- Chamber: The large cylinder where you put the coffee and water.
- Plunger: Fits inside the chamber and pushes the coffee through the filter.
- Filter Cap: Holds the paper or metal filter in place.
- Filter: A paper or metal disc that strains the coffee.
Follow these steps to disassemble:
- Remove the filter cap by twisting it off.
- Take out the filter disc from the cap.
- Pull the plunger out of the chamber slowly.
Here is a simple table to remember the parts and their cleaning needs:
| Part | Cleaning Method | Notes |
|---|---|---|
| Chamber | Rinse with warm water, use mild soap if oily | Check for coffee residue inside |
| Plunger | Wipe rubber seal, rinse with water | Avoid harsh scrubbing on rubber |
| Filter Cap | Rinse and scrub gently | Remove stuck grounds |
| Filter | Dispose if paper, rinse if metal | Replace paper filters regularly |
Tips For Easy Cleaning
Clean your AeroPress soon after brewing. Fresh coffee oils and grounds are easier to remove. Follow these tips for fast and easy cleaning:
- Use warm water: It dissolves oils better than cold water.
- Rinse immediately: Prevents coffee from drying and sticking.
- Use a soft sponge or cloth: Protect the plastic parts from scratches.
- Clean the rubber seal gently: Avoid damage that can cause leaks.
- Use a toothpick or brush: Remove coffee stuck in small spaces.
For deep cleaning, soak parts in warm soapy water for 10-15 minutes. Rinse well before use. Avoid harsh chemicals or abrasive materials. They can harm the plastic and rubber.
Storing your AeroPress dry helps prevent mold and bad smells. Let all parts air dry completely before putting them away. A clean, dry AeroPress stays fresh and ready for the next cup.
Experimenting With Flavors
Experimenting with flavors in your Aeropress coffee can make every cup a new experience. Small changes create big differences in taste and aroma. This process lets you find your perfect coffee style. Play with brewing steps, coffee types, and times. Enjoy discovering what suits your palate best.
Adjusting Brew Time
Brew time controls how much flavor the coffee releases. Shorter brew times usually make lighter, milder coffee. Longer times bring out stronger, bolder flavors. The Aeropress is great for testing different brew lengths.
Try these brewing times to see how they change taste:
- 30 seconds: Light body, bright and fresh flavors.
- 1 minute: Balanced taste, medium strength.
- 2 minutes: Full-bodied, richer and deeper flavors.
Use this table to guide your experiments:
| Brew Time | Flavor Profile | Body |
|---|---|---|
| 30 seconds | Bright, mild acidity | Light |
| 1 minute | Balanced, smooth | Medium |
| 2 minutes | Rich, bold | Full |
Start with a medium brew time, then adjust based on your taste. Note the changes in flavor and strength. Keep notes to remember your favorite brew times. This simple step improves your coffee experience with the Aeropress.
Trying Different Coffee Varieties
Coffee beans come from many regions, each with unique flavors. Using different coffee varieties changes your Aeropress coffee taste. You can explore fruity, nutty, floral, or chocolatey notes by switching beans.
Try these popular coffee varieties:
- Arabica: Smooth, mild, with sweet and fruity hints.
- Robusta: Stronger, bitter, with earthy tones.
- Single-origin: Beans from one farm, pure and distinct flavors.
- Blends: Mix of beans, balanced and complex taste.
Use this comparison chart for quick selection:
| Coffee Type | Flavor Notes | Body |
|---|---|---|
| Arabica | Sweet, fruity, floral | Light to medium |
| Robusta | Bitter, earthy, strong | Full |
| Single-origin | Unique, bright, complex | Varies |
| Blends | Balanced, rich | Medium to full |
Buy small amounts of different beans to test. Grind them fresh before brewing. Write down your impressions for each type. This way, you can create your own Aeropress coffee style. Exploring coffee varieties is fun and rewarding.
Credit: www.questcoffee.com.au

Credit: methodicalcoffee.com
Frequently Asked Questions
How Do You Prepare Coffee With An Aeropress?
To prepare coffee with an Aeropress, add ground coffee and hot water. Stir for 10 seconds, then press slowly. This method brews rich, smooth coffee in minutes.
What Grind Size Is Best For Aeropress Coffee?
Medium-fine grind works best for Aeropress coffee. It allows optimal extraction during the short brewing time. Avoid too coarse or too fine grinds for balanced flavor.
How Long Should You Brew Coffee In An Aeropress?
Brew coffee in an Aeropress for about 1 to 2 minutes. This brewing time extracts the right flavors without bitterness or under-extraction.
Can You Make Espresso-style Coffee With An Aeropress?
Yes, Aeropress can make espresso-style coffee. Use finely ground beans, less water, and press firmly for a concentrated shot similar to espresso.
Conclusion
Making coffee with an Aeropress is simple and fun. You only need a few steps to get a tasty cup. This method lets you control the strength and flavor easily. Try different coffee amounts and water temperatures to find your best taste.
Clean-up is quick, so you can enjoy coffee anytime. Give the Aeropress a try for a fresh coffee experience at home. Brewing good coffee does not have to be hard. Just practice a little, and you will enjoy every sip.

