Roasting coffee beans is a rewarding process that can transform your coffee experience. It brings out the rich, complex flavors hidden within the beans. If you’ve ever wondered how to roast coffee beans, the good news is that you can do it right at home with just a few simple tools.
Roasting coffee beans at home allows you to enjoy a fresh, personalized cup of coffee. The process might seem daunting at first, but it’s straightforward with a bit of practice. You can control the roast level, from light to dark, enhancing the coffee’s taste to your preference.
Plus, home roasting is cost-effective and ensures you always have fresh coffee. Ready to start your journey into home coffee roasting? Let’s explore the steps to roast your coffee beans perfectly and enjoy a delicious, aromatic cup of coffee every time.
Choosing Green Beans
Roasting coffee beans at home can be a fun and rewarding experience. The first step to great coffee is choosing the right green beans. This step is crucial because the quality of your green beans will determine the flavor and aroma of your coffee. Let’s dive into the essentials of selecting the best green beans for roasting.
Types Of Beans
There are several types of coffee beans available. Each type has unique characteristics and flavor profiles. Here are the main types of beans you should know:
- Arabica: Known for its smooth, sweet taste with hints of fruit and sugar. It is the most popular type and generally considered higher quality.
- Robusta: Has a stronger, harsher taste with more caffeine. Often described as having a nutty or chocolate flavor. It is more resistant to disease and can be grown at lower altitudes.
- Liberica: Rare and unique, with a smoky, floral aroma. It has a complex flavor profile that is not as widely appreciated as Arabica or Robusta.
- Excelsa: A variety of Liberica, known for its tart, fruity flavor. It adds depth and complexity to coffee blends.
Choosing the right type of bean depends on your taste preferences. Arabica beans are ideal for those who enjoy a mild and sweet coffee. Robusta beans are better for those who prefer a strong and bold flavor. Experiment with different types to find the perfect bean for your palate.
Sourcing Quality Beans
Finding high-quality green beans is essential for a great roast. Here are some tips to ensure you get the best beans:
- Research Suppliers: Look for reputable suppliers who specialize in green coffee beans. Check online reviews and ask for recommendations from other home roasters.
- Check for Freshness: Fresh green beans are crucial for a good roast. Look for beans that have been harvested within the past year. Avoid beans that look old or have a faded color.
- Consider Origin: The origin of the beans can affect their flavor. Beans from Ethiopia, Colombia, and Brazil are known for their high quality. Each region has distinct flavor profiles, so try beans from different places.
- Inspect the Beans: High-quality beans should be uniform in size and color. They should be free of defects like cracks or discoloration. Inspect the beans closely before purchasing.
- Buy in Small Quantities: To ensure freshness, buy small quantities of beans. Store them in a cool, dry place to maintain their quality.
Here’s a quick comparison table to help you understand the different characteristics:
| Type | Flavor Profile | Best For |
|---|---|---|
| Arabica | Sweet, Fruity | Mild, Sweet Coffee |
| Robusta | Strong, Bitter | Bold, Strong Coffee |
| Liberica | Smoky, Floral | Unique, Complex Flavors |
| Excelsa | Tart, Fruity | Blends |
By following these tips, you can ensure that you start your roasting journey with the best green beans. High-quality beans will lead to delicious, aromatic coffee that you can enjoy every day.
Essential Equipment
Roasting coffee beans at home can be a fun and rewarding hobby. The right equipment is crucial for achieving the best results. In this guide, we will discuss the essential equipment needed for roasting coffee beans at home. We’ll also cover different roasting methods and the tools you’ll need to get started.
Roasting Methods
There are several methods for roasting coffee beans. Each method has its pros and cons. Here are a few popular ones:
- Stovetop Popcorn Popper: Affordable and simple. It requires constant stirring.
- Oven Roasting: Easy to use. Results can be inconsistent.
- Air Roaster: Provides even roasting. Can be noisy.
- Drum Roaster: Professional-grade. Expensive and larger in size.
Each method affects the flavor and aroma of the coffee. For example, a stovetop popcorn popper can give a rustic taste. Oven roasting might introduce uneven roasts but is beginner-friendly. Air roasters are great for even roasts and easy control. Drum roasters are used by professionals for the best quality but require a bigger investment.
Choosing a method depends on your preference and budget. Here’s a quick comparison:
| Method | Pros | Cons |
|---|---|---|
| Stovetop Popcorn Popper | Affordable, Simple | Requires constant stirring |
| Oven Roasting | Easy to use | Inconsistent results |
| Air Roaster | Even roasting, Easy control | Noisy |
| Drum Roaster | Professional-grade quality | Expensive, Large size |
Tools You Need
To roast coffee beans, you’ll need a few essential tools. Each tool plays a crucial role in the roasting process. Here is a list of what you need:
- Roasting Device: This can be a popcorn popper, oven, air roaster, or drum roaster.
- Thermometer: Helps monitor the temperature to ensure even roasting.
- Cooling Tray: Quickly cools down the beans after roasting.
- Scale: Measures the beans accurately before and after roasting.
- Storage Containers: Airtight containers to keep your roasted beans fresh.
Each tool is essential for a smooth roasting process. The roasting device is the most important, as it determines the method. A thermometer ensures you maintain the right temperature. Cooling trays are vital for stopping the roasting process at the right moment. Scales are important for measuring exact quantities, ensuring consistency. Storage containers keep your beans fresh, preserving their flavor.
Here’s a quick look at these tools:
| Tool | Purpose |
|---|---|
| Roasting Device | Roast the beans |
| Thermometer | Monitor temperature |
| Cooling Tray | Cool beans quickly |
| Scale | Measure beans |
| Storage Containers | Keep beans fresh |
Investing in these tools will help you achieve the perfect roast. Each step and tool contributes to the overall quality of your coffee. Happy roasting!
Roasting Process
Roasting coffee beans at home is a delightful experience. It allows you to control the flavor and freshness of your coffee. The roasting process is the heart of this journey. It transforms raw green beans into aromatic, flavorful coffee. Let’s dive into the steps involved in this fascinating process.
Preheating The Roaster
Preheating the roaster is a crucial first step. It ensures the beans roast evenly. To begin, set the roaster to the desired starting temperature. This is usually around 350°F (175°C). Let it heat up for about 10-15 minutes. This stabilizes the roaster and prepares it for the beans.
During preheating, you can:
- Calibrate the temperature settings.
- Check the airflow and ventilation.
- Ensure all components are working properly.
Preheating helps achieve a consistent roast. It also reduces the moisture content of the beans early in the process. Here’s a quick guide:
| Step | Action |
|---|---|
| 1 | Set the starting temperature. |
| 2 | Heat the roaster for 10-15 minutes. |
| 3 | Check the airflow and components. |
Remember, a well-preheated roaster sets the stage for a perfect roast. It ensures the beans receive even heat, leading to a balanced flavor profile.
Timing And Temperature
Timing and temperature are key to achieving the perfect roast. Roasting involves various stages. Each stage affects the flavor and aroma of the coffee. Here’s a breakdown:
- Drying Phase: Start at a lower temperature around 350°F (175°C). This phase lasts 4-6 minutes. It reduces the moisture in the beans.
- Yellowing Phase: Increase the temperature to 400°F (205°C). Beans turn yellow and start to smell like toast.
- First Crack: Raise the temperature to 420°F (215°C). Beans crack and expand. This phase is crucial for flavor development.
- Development Phase: Maintain the temperature around 430°F (220°C). Monitor closely. This phase lasts 1-3 minutes. Beans reach the desired roast level.
- Cooling: Quickly cool the beans to stop roasting. This preserves the flavor.
Each phase is essential. Small changes in timing or temperature can alter the final taste. Use a timer and thermometer to track progress. Here’s a simple table to keep things clear:
| Phase | Temperature (°F) | Duration (Minutes) |
|---|---|---|
| Drying | 350 | 4-6 |
| Yellowing | 400 | 2-4 |
| First Crack | 420 | 3-5 |
| Development | 430 | 1-3 |
By carefully managing timing and temperature, you can achieve a perfect roast. Experiment and take notes. This helps in refining your technique and producing consistently great coffee.
Credit: inthekitch.net
Color And Aroma Changes
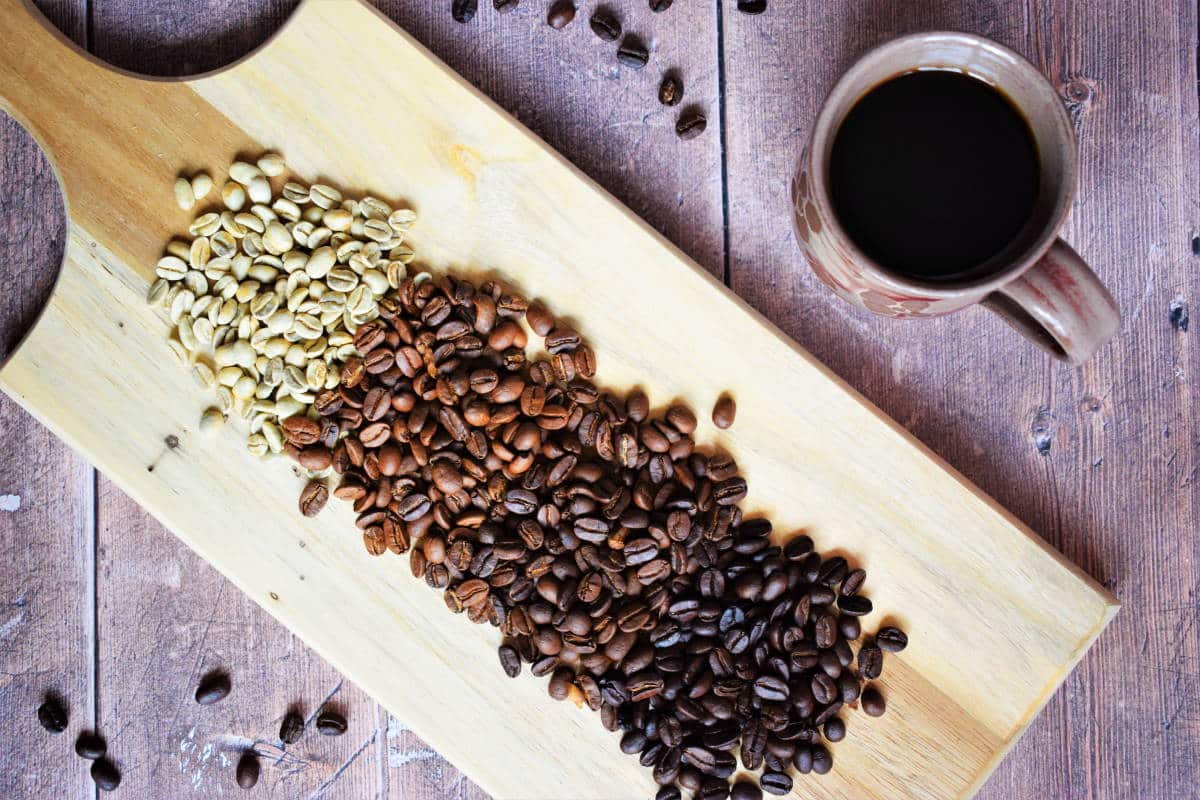
Roasting coffee beans is an art that involves understanding the subtle changes in color and aroma. These changes signal the progression of the roast and help in achieving the desired flavor profile. As the beans roast, they go through various stages, each marked by specific changes in color and aroma.
First And Second Crack
During the roasting process, coffee beans go through two distinct stages known as the first crack and the second crack. These cracks are audible and signify important changes within the beans.
First Crack:
- The first crack occurs at approximately 385°F (196°C).
- It sounds like popcorn popping.
- This stage indicates that the beans are reaching the beginning of the light roast stage.
- The beans start to expand and release steam.
- At this point, the beans are light brown and have a fruity aroma.
Second Crack:
- The second crack happens at around 435°F (224°C).
- This crack is quieter and more subtle than the first.
- It indicates the transition to a darker roast.
- During this stage, the beans undergo further chemical changes.
- They turn dark brown and develop a richer, more robust aroma.
Identifying Roast Levels
Identifying roast levels is crucial for achieving the perfect cup of coffee. Each roast level has unique characteristics in terms of color, aroma, and flavor.
Light Roast:
- Color: Light brown
- Aroma: Fruity and floral
- Flavor: High acidity with a light body
Medium Roast:
- Color: Medium brown
- Aroma: Balanced with hints of sweetness
- Flavor: Balanced acidity and body
Dark Roast:
- Color: Dark brown to almost black
- Aroma: Rich and robust
- Flavor: Low acidity with a heavy body
Here’s a table summarizing the characteristics of each roast level:
| Roast Level | Color | Aroma | Flavor |
|---|---|---|---|
| Light Roast | Light brown | Fruity and floral | High acidity, light body |
| Medium Roast | Medium brown | Balanced, sweet | Balanced acidity and body |
| Dark Roast | Dark brown to black | Rich, robust | Low acidity, heavy body |
Cooling The Beans
Roasting coffee beans is an art that requires precision and skill. One crucial step in this process is cooling the beans. Proper cooling ensures that the beans stop roasting at the right moment, preserving their flavor and aroma. Let’s dive into the techniques and importance of cooling the beans after roasting.
Techniques For Cooling
There are several methods to cool roasted coffee beans. Each method has its own benefits and can be chosen based on personal preference or availability of tools.
Here are some popular techniques:
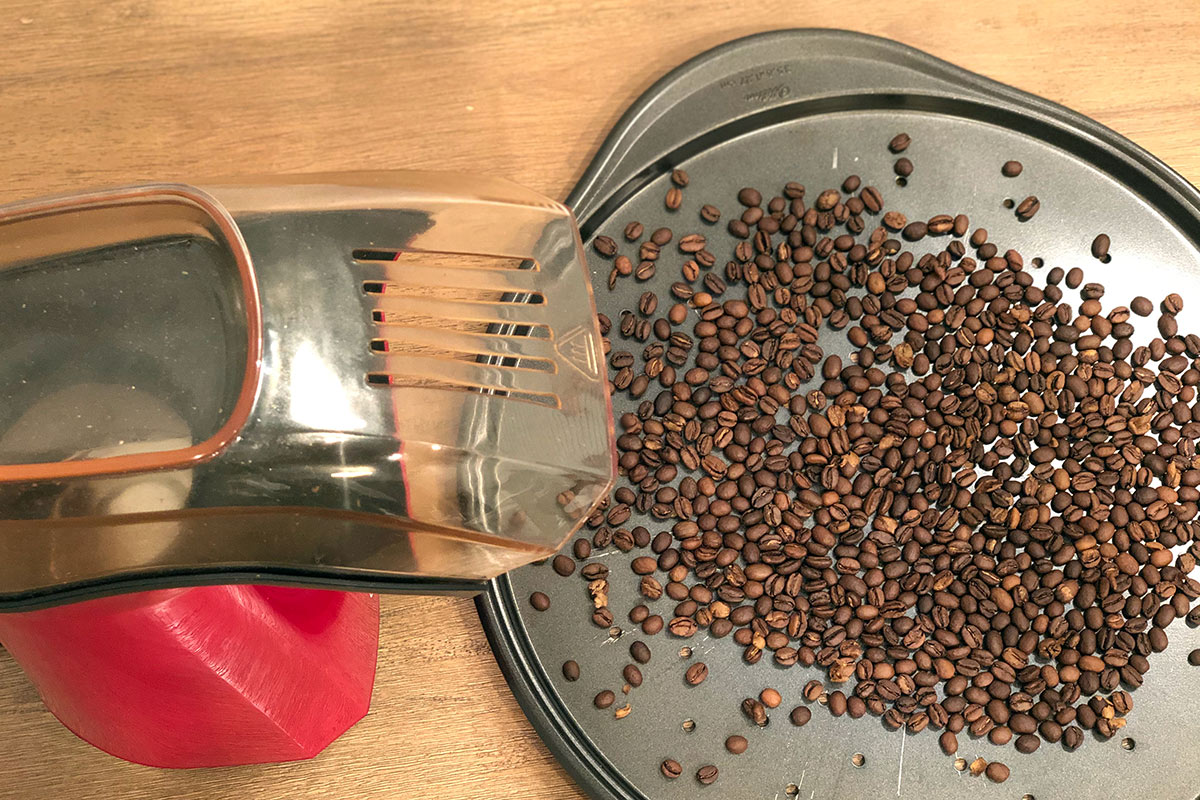
- Air Cooling: This is the most common technique. Spread the beans on a large tray and let them cool naturally in the air. Stir occasionally to ensure even cooling.
- Cooling Tray: Many coffee roasters come with a built-in cooling tray. Once roasting is complete, transfer the beans to the tray. The tray has a fan that blows air through the beans, cooling them quickly.
- Water Quenching: This method involves spraying a fine mist of water over the beans. It cools them rapidly but can affect the moisture content of the beans.
- Cooling Drum: Some advanced roasters have a cooling drum. The drum rotates the beans while blowing air through them, ensuring uniform cooling.
Using a combination of these methods can also be effective. For instance, start with air cooling and finish with a cooling tray.
| Method | Equipment Needed | Pros | Cons |
|---|---|---|---|
| Air Cooling | Tray | Simple, No extra cost | Slower cooling time |
| Cooling Tray | Built-in tray with fan | Fast, Even cooling | Requires a roaster with a cooling tray |
| Water Quenching | Water spray bottle | Very fast | Can affect moisture content |
| Cooling Drum | Drum with fan | Uniform cooling | Expensive equipment |
Importance Of Cooling
Cooling the beans immediately after roasting is crucial. It stops the roasting process and locks in the flavors.
Here are some reasons why cooling is important:
- Prevent Over-Roasting: Beans continue to roast even after being removed from heat. Immediate cooling stops this process, preventing over-roasting.
- Preserve Flavor: Proper cooling helps retain the beans’ natural flavors and aromas. It prevents the beans from developing a burnt taste.
- Maintain Quality: Rapid cooling ensures that the beans maintain their quality. It prevents the formation of undesirable compounds that can affect taste.
- Consistency: Cooling the beans uniformly ensures consistency in taste and quality. It is essential for achieving a balanced cup of coffee.
In summary, cooling is a vital step in coffee roasting. It ensures that the beans stop roasting at the desired level and maintain their flavor and quality. Whether you use air cooling, a cooling tray, or another method, make sure to cool your beans properly for the best results.
Credit: pullandpourcoffee.com
Storing Roasted Beans
Roasting coffee beans at home is a rewarding experience. But knowing how to store your roasted beans is crucial to keep them fresh and flavorful. Proper storage ensures that you enjoy every cup to its fullest potential.
Best Storage Methods
To maintain the quality of your roasted coffee beans, consider the following storage methods:
- Airtight Containers: Use containers that seal tightly to prevent air from entering. Air can cause oxidation, leading to stale beans.
- Opaque Containers: Light can degrade coffee beans. Use opaque containers to protect your beans from light exposure.
- Cool, Dark Place: Store your containers in a cool and dark location. Avoid places near heat sources like ovens or stoves.
Here is a comparison of common storage methods:
| Storage Method | Pros | Cons |
|---|---|---|
| Airtight Container | Keeps beans fresh, prevents oxidation | May be more expensive |
| Opaque Container | Protects from light | Needs to be stored in a cool place |
| Freezer | Prolongs shelf life | Can cause moisture exposure |
Shelf Life Considerations
Understanding the shelf life of roasted coffee beans helps you enjoy them at their peak freshness:
- One Week: Freshly roasted beans are best within the first week. Their flavors are most vibrant during this period.
- Two to Four Weeks: Beans can still taste good up to four weeks. Store them properly to maintain their quality.
- Beyond Four Weeks: Beans start losing their flavor after four weeks. Use them for brewing methods where freshness is less critical, like cold brew.
Here is a general guideline for the shelf life of roasted coffee beans:
| Storage Condition | Shelf Life | Notes |
|---|---|---|
| Room Temperature (Airtight Container) | 2-4 weeks | Best for short-term use |
| Freezer (Airtight Container) | 3-6 months | Prolongs shelf life but can affect flavor |
| Refrigerator (Airtight Container) | 1-2 months | Not recommended due to moisture |
Always note the roast date and try to consume your beans within the recommended time frame for the best coffee experience.
Brewing Techniques
Roasting coffee beans is an art. Once you’ve roasted your beans to perfection, it’s essential to understand brewing techniques. The right brewing method can elevate the flavor and aroma of your coffee. This section will guide you through the importance of grind size and various brewing methods.
Grind Size Matters
The grind size of your coffee beans plays a crucial role in the final taste of your brew. Different brewing methods require different grind sizes. Here are some key points to consider:
- Coarse Grind: Ideal for French press and cold brew. It has a chunky texture, resembling sea salt.
- Medium-Coarse Grind: Suitable for Chemex. It has a texture similar to rough sand.
- Medium Grind: Works well with drip coffee makers and siphon brewers. It has a texture like regular sand.
- Fine Grind: Perfect for espresso machines and Aeropress (with a short brew time). It has a texture like table salt.
- Extra-Fine Grind: Used for Turkish coffee. It has a powdery texture, almost like flour.
Choosing the right grind size ensures proper extraction. Over-extraction can lead to a bitter taste, while under-extraction can result in a sour flavor. Here’s a table to summarize:
| Grind Size | Brewing Method |
|---|---|
| Coarse | French Press, Cold Brew |
| Medium-Coarse | Chemex |
| Medium | Drip Coffee Maker, Siphon Brewer |
| Fine | Espresso Machine, Aeropress |
| Extra-Fine | Turkish Coffee |
Brewing Methods
Different brewing methods bring out unique flavors in coffee. Here are some popular methods:
- French Press: Coarse grind. Steep coffee in hot water for 4 minutes. Press the plunger slowly.
- Pour-Over: Medium grind. Pour hot water over coffee grounds in a filter. Use a circular motion for even extraction.
- Espresso Machine: Fine grind. Use high pressure to force hot water through coffee grounds quickly.
- Aeropress: Fine grind. Steep coffee in hot water for about 1 minute. Press through a filter.
- Cold Brew: Coarse grind. Steep coffee in cold water for 12-24 hours. Strain and serve cold.
Each method has its own charm. The French Press gives a full-bodied flavor. Pour-Over highlights delicate notes. Espresso is rich and intense. Aeropress is versatile and easy to use. Cold Brew is smooth and refreshing.
Here’s a quick guide:
| Brewing Method | Grind Size | Brewing Time |
|---|---|---|
| French Press | Coarse | 4 minutes |
| Pour-Over | Medium | 3-4 minutes |
| Espresso Machine | Fine | 25-30 seconds |
| Aeropress | Fine | 1 minute |
| Cold Brew | Coarse | 12-24 hours |
Experimenting With Flavors
Roasting coffee beans at home is a fun and rewarding process. One of the most exciting parts is experimenting with flavors. You can create unique tastes by adding different ingredients and mixing various beans. This section will guide you through these steps to enhance your coffee experience.
Adding Ingredients
Experimenting with flavors can start by adding ingredients during the roasting process. This can give your coffee a unique taste. Here are some ingredients you can add:
- Spices: Cinnamon, nutmeg, or cardamom can add a warm, spicy note.
- Herbs: Fresh herbs like mint or rosemary can create a fresh, aromatic flavor.
- Fruits: Dried orange peel or berries can infuse your coffee with fruity undertones.
- Chocolate: Cocoa nibs can give a rich, chocolatey taste.
When adding these ingredients, start with small amounts. Too much can overpower the coffee’s natural flavor. You can add them directly to the beans before or during roasting. Here’s a simple table to guide you:
| Ingredient | Suggested Amount | Timing |
|---|---|---|
| Cinnamon | 1 tsp per cup of beans | Before roasting |
| Mint | 5-6 leaves | During roasting |
| Orange Peel | 1 tsp grated | Before roasting |
| Cocoa Nibs | 1 tbsp | During roasting |
Start with these suggestions and adjust to your taste. Remember to keep notes of what you like best.
Creating Unique Blends
Creating unique blends involves mixing different coffee beans. This process can help you discover new flavors and aromas. Here are some tips to get started:
- Choose Your Beans: Select beans from different regions. Each region has its own flavor profile.
- Mix and Match: Blend beans with complementary flavors. For example, mix a fruity Ethiopian bean with a chocolatey Colombian bean.
- Roast Separately: Roast each type of bean separately. Different beans may require different roasting times.
- Combine After Roasting: Mix the roasted beans together. This allows you to control the final flavor better.
Here’s an example blend you can try:
| Bean Type | Region | Flavor Profile | Suggested Ratio |
|---|---|---|---|
| Arabica | Ethiopia | Fruity, Floral | 60% |
| Robusta | India | Strong, Earthy | 40% |
Document your experiments to find your perfect blend. Taste the results and adjust the ratios as needed. This way, you will develop a unique blend that suits your palate.
Credit: www.reddit.com
Frequently Asked Questions
What Equipment Do I Need To Roast Coffee Beans?
To roast coffee beans, you’ll need a coffee roaster, green coffee beans, a cooling tray, and a storage container. You can use a specialized coffee roasting machine or a simple pan on the stove. Choose equipment based on your preference and budget.
How Long Does It Take To Roast Coffee Beans?
Roasting coffee beans typically takes 10 to 20 minutes. The exact time depends on the roasting method and desired roast level. Always monitor the beans to prevent over-roasting.
What Temperature Should I Roast Coffee Beans At?
Roast coffee beans at temperatures between 370°F to 540°F (188°C to 282°C). The ideal temperature depends on the roast level you desire. Light roasts require lower temperatures, while dark roasts need higher temperatures.
How Do I Know When Coffee Beans Are Done Roasting?
Coffee beans are done roasting when they reach your desired roast level. Light roasts have a light brown color, medium roasts are medium brown, and dark roasts are dark brown. Listen for the first and second crack sounds for guidance.
Conclusion
Roasting coffee beans at home is fun and rewarding. You control the flavor. Start with fresh beans for the best taste. Pay attention to the roasting process. Use different methods to find what you like. Practice makes perfect. Enjoy your homemade, fresh coffee every morning.
Share your coffee with friends and impress them. Happy roasting!


